
In summary:
- Immediately stop all exfoliating acids (AHAs, BHAs) and retinoids to end the assault on your skin.
- Focus on a “less is more” routine: a gentle cleanser, a hydrating serum, a barrier-repair moisturizer, and sunscreen.
- Always apply hydrating products like hyaluronic acid to damp skin and immediately seal with a moisturizer to lock in water.
- Incorporate occlusive ingredients like petrolatum or squalane as the final step at night to prevent overnight water loss.
That familiar sting when applying even the gentlest products, the persistent redness, tightness, and flaking—these are the tell-tale signs of a compromised skin barrier. You likely arrived here after enthusiastically embracing the world of active ingredients, only to find your skin is now reactive and distressed. The common advice is to simply moisturize and wait, but this overlooks the fundamental science of what’s happening. Many people try piling on popular ingredients like hyaluronic acid, only to find their skin feels even tighter.
The truth is, repairing your skin isn’t about adding more products; it’s about creating the perfect environment for your skin to heal itself. Think of it as creating a personal, humid greenhouse for your face. This requires a strategic understanding of how water moves through your skin and how to effectively trap it. While quick fixes are tempting, true, lasting repair is a process. But with the right corrective approach, you can significantly calm irritation and rebuild your skin’s resilience, often seeing a dramatic improvement within a couple of weeks.
This guide will walk you through the precise, esthetician-approved steps to restore your skin’s health. We will explore the critical role of occlusives, the correct way to use hydrators, the specific ingredients that rebuild your barrier, and the common mistakes—even in your shower routine—that could be sabotaging your progress. Let’s gently guide your skin back to a state of calm, comfortable equilibrium.
Summary: A Step-by-Step Guide to Soothing a Damaged Skin Barrier
- Why Your Moisturizer Evaporates if You Don’t Use an Occlusive?
- How to Apply Hyaluronic Acid Without Drying Out Your Skin?
- Glycerin vs Ceramides: Which Is Better for Barrier Repair?
- The Acid Mistake That Destroys Your Acid Mantle
- Slugging: When to Use Petrolatum to Seal Hydration Overnight
- The Shampooing Mistake That Strips Your Scalp Barrier
- Why Cabin Air Pressure Dehydrates You Faster Than the Desert?
- How to Apply Sunscreen Under Makeup Without Pilling?
Why Your Moisturizer Evaporates if You Don’t Use an Occlusive?
If you’ve ever applied a moisturizer to your tight, damaged skin only to feel dry again an hour later, you’ve experienced the impact of Transepidermal Water Loss (TEWL). This is the process where water passively evaporates from the skin’s surface into the air. A healthy skin barrier, with its tightly packed lipids, acts like a waterproof seal, keeping TEWL to a minimum. When this barrier is damaged—as it is from over-exfoliation—it’s like having tiny cracks in that seal. Water escapes freely, and no amount of simple moisturizer can plug the leak on its own.
This is where occlusives become non-negotiable. While humectants (like glycerin) draw water into the skin and emollients (like fatty acids) soften it, occlusives form a physical barrier on top. They are the “lid” that seals everything in, creating that “greenhouse effect” we’re aiming for. Ingredients like petrolatum, dimethicone, lanolin, and squalane don’t add moisture themselves; they are the gatekeepers that stop the hydration you’ve just applied from vanishing into thin air. Without this final sealing step, your hydrating serums and creams are fighting a losing battle against evaporation, especially in dry environments.
Action Plan: The Perfect Occlusive Seal
- Damp Skin First: Immediately after cleansing, while your skin is still damp, apply your hydrating toner or serum. This gives your products water to hold onto.
- Layer the Moisturizer: While the skin is still slightly damp from your serum, apply a ceramide-rich moisturizer to start rebuilding the barrier structure.
- Seal the Deal: Within 60 seconds of applying your moisturizer, press a thin layer of an occlusive (like petrolatum, squalane, or a rich balm) over top to lock in all the hydration.
By following this method, you are not just moisturizing; you are actively managing your skin’s hydration levels and giving your barrier the protected, high-moisture environment it needs to repair its own structure. This simple shift in application can make a world of difference.
How to Apply Hyaluronic Acid Without Drying Out Your Skin?
Hyaluronic acid (HA) is marketed as the ultimate hydrator, capable of holding up to 1,000 times its weight in water. Yet, for those with a damaged barrier, it can paradoxically make skin feel even tighter and drier. This isn’t the fault of the ingredient, but a misunderstanding of how it works. HA is a humectant, meaning it acts like a sponge, pulling moisture from its surrounding environment. When you apply it in a humid setting, it pulls moisture from the air and holds it against your skin, leaving you plump and dewy.
However, if the air around you is dry (like in a heated room or on an airplane), and your skin barrier is compromised, the HA has nowhere to draw moisture from externally. Instead, it pulls water from the deeper layers of your own skin up to the surface, where it can then evaporate. This process leads to even more dehydration. For HA to work its magic on compromised skin, you must provide the water for it to hold onto. Applying it to bone-dry skin is one of the most common mistakes that sabotages barrier repair.
This paragraph introduces the complex concept of humectants. To better understand the proper application, it’s helpful to visualize the process. The illustration below shows the correct technique of applying serum to already moistened skin.
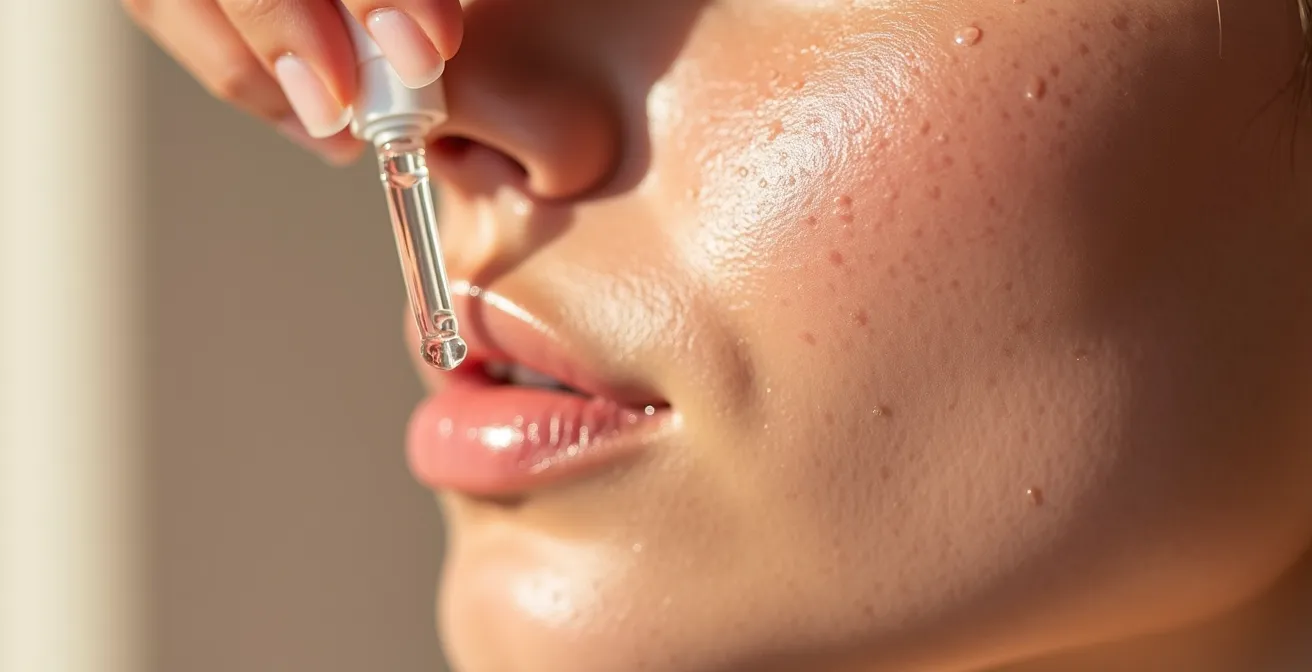
As you can see, the key is to create a “hydration sandwich.” The bottom layer is water (from cleansing or a facial mist), the middle layer is the HA serum which grabs that water, and the top layer is an occlusive moisturizer that seals it all in. This ensures the HA hydrates your skin, not the air around you.
Glycerin vs Ceramides: Which Is Better for Barrier Repair?
When your skin barrier is in crisis, the instinct is to grab any product labeled “hydrating.” However, understanding the different roles of key ingredients is crucial for effective repair. The debate between glycerin and ceramides is a perfect example; it’s not about which is “better,” but about recognizing that they perform two distinct, equally vital jobs. Think of rebuilding your skin barrier like repairing a brick wall: you need both water for the mortar and the bricks themselves.
Glycerin is a classic humectant, much like hyaluronic acid. Its job is to be the “water for the mortar.” It draws moisture into the stratum corneum (the outermost layer of skin), keeping it pliable and hydrated. It is an excellent, cost-effective ingredient for boosting surface hydration. However, it doesn’t do much to repair the structural integrity of the “wall” itself. That’s where ceramides come in. Ceramides are lipids (fats) that act as the “bricks.” In fact, clinical research shows that ceramides make up about 50% of the skin’s lipid barrier. When you over-exfoliate, you are literally stripping away these crucial structural components.
Case in Point: The Power of a Complete Lipid Blend
Topical application of ceramides is not just theoretical. Clinical studies consistently demonstrate that moisturizers containing ceramides can significantly improve skin hydration and restore barrier function within just 24 hours. The most effective formulations go a step further by mimicking the skin’s own natural composition: a 3:1:1 ratio of ceramides, cholesterol, and fatty acids. This complete blend provides all the necessary components to patch the “cracks” in your barrier, not just temporarily hydrate the surface.
So, the answer is clear: you need both. A repair strategy should include glycerin to draw in water and, most importantly, a ceramide-dominant moisturizer (ideally with cholesterol and fatty acids) to rebuild the physical structure of your skin’s protective wall.
The Acid Mistake That Destroys Your Acid Mantle
The journey to a damaged barrier often begins with an overzealous use of chemical exfoliants. While AHAs (like glycolic acid) and BHAs (like salicylic acid) are fantastic for skin texture and clarity when used correctly, they can wreak havoc when overused. They work by dissolving the “glue” that holds dead skin cells together, but in the process, they also disrupt two of your skin’s crucial defense systems: the lipid barrier and the acid mantle. The acid mantle is a very thin, slightly acidic film (pH 4.5-5.5) on the skin’s surface that acts as the first line of defense against bacteria and environmental pollutants. Aggressive, high-concentration acids or daily exfoliation can raise the skin’s pH, weakening this mantle and leaving it vulnerable.
Many people unknowingly perpetuate this damage by continuing to use cleansers that contain exfoliating acids, believing they are simply “cleansing” their skin. As dermatologist Dr. Debra Jaliman points out, this is a critical error when the skin is already compromised.
A lot of people use exfoliating cleansers that have glycolic acid or salicylic acid. You’d want to use a cleanser that has glycerin or hyaluronic acids or ceramides.
– Dr. Debra Jaliman, TODAY.com interview on skin barrier repair
The first and most critical step in repair is a complete “acid detox.” This means removing *all* exfoliating acids and retinoids from your routine to stop the assault. Once your skin feels calm and resilient again—typically after 2-4 weeks—you can think about reintroducing them slowly and strategically.
- Week 1-2: Complete acid detox. Your routine should only contain gentle cleansers, hydrators, and barrier-repair moisturizers.
- Week 3: If your skin is calm, you can introduce a very gentle PHA (polyhydroxy acid) toner twice a week. PHAs have a larger molecule size and are less irritating.
- Week 4: If there is no irritation, you can add a BHA product once per week, focusing only on congested areas.
- Week 5+: Gradually increase frequency based on your skin’s tolerance, always monitoring for signs of redness or stinging. This is the foundation of “skin cycling.”
Slugging: When to Use Petrolatum to Seal Hydration Overnight
“Slugging” has become a viral trend, but for those with a severely damaged barrier, it’s a long-standing dermatological technique with a simple, powerful purpose. It is the ultimate expression of an occlusive step. The practice involves applying a thin layer of a petrolatum-based ointment (like Vaseline, Aquaphor, or CeraVe Healing Ointment) as the absolute final step in your nighttime routine. Its goal is not to moisturize, but to create an impermeable seal that dramatically reduces Transepidermal Water Loss (TEWL) while you sleep.
Overnight is when your skin’s repair mechanisms are most active, but it’s also a time of significant passive water loss, especially if you sleep in a dry, climate-controlled room. By creating this seal, you trap all the moisture from the hydrating serums and creams you’ve applied underneath, along with your skin’s own natural moisture. This creates an intensely hydrated, protected environment that supercharges the healing process. The visible result is often waking up to calmer, plumper, and significantly less irritated skin. This simple step can be a game-changer during the initial, most intense phase of barrier repair.
The concept is to create a peaceful, restorative environment for the skin to heal. The image below captures the essence of this overnight protection, resulting in serene, dewy skin by morning.

However, a word of caution is needed. While petrolatum itself is non-comedogenic (meaning it doesn’t clog pores), it can trap oils, dead skin cells, and bacteria that are already on the skin. Therefore, it’s crucial to apply it only to a thoroughly cleansed face. Those with very oily or acne-prone skin should approach slugging with caution, perhaps trying it on a small patch first or opting for a lighter occlusive like squalane.
The Shampooing Mistake That Strips Your Scalp Barrier
In the focused effort to heal the skin on your face, it’s easy to overlook a daily ritual that could be undermining your progress: washing your hair. The scalp is also skin, and it has a protective barrier that can be stripped by the same culprits that harm your face. Harsh surfactants, like Sodium Lauryl Sulfate (SLS), found in many shampoos, are highly effective at removing oil but can be excessively stripping for both the scalp and the delicate facial skin they inevitably run over in the shower.
The problem is compounded by water temperature. Many of us enjoy hot showers, but this is a direct enemy of a healthy skin barrier. While there isn’t a specific temperature threshold, it’s widely accepted in dermatology that hot water strips away the natural oils (lipids) that form the barrier’s foundation, leading to increased dryness and irritation. When your facial skin is already compromised, even a few moments of hot, sulfate-laden water running down from your scalp can be enough to cause a setback, leading to renewed redness and stinging around the hairline and temples.
Protecting your face during your shower routine requires a conscious, multi-step approach. You need to treat the runoff from your hair as a potential irritant and take steps to mitigate its effects.
- Step 1: When washing and rinsing your hair, tilt your head back as much as possible to minimize the amount of shampoo and conditioner that runs down your face.
- Step 2: During the 2-4 week intensive repair period, switch to a sulfate-free and fragrance-free shampoo to reduce the irritant load.
- Step 3: As soon as you step out of the shower, gently pat your face dry and immediately apply a pH-balancing facial mist to counteract any effects from the water.
- Step 4: Make a conscious effort to keep your shower water lukewarm, not hot. If it’s turning your skin red, it’s too hot.
Why Cabin Air Pressure Dehydrates You Faster Than the Desert?
Understanding the profound impact of your environment on your skin is key to protecting a fragile barrier. Nothing illustrates this more starkly than air travel. Many people notice their skin feels tight and dry after a flight, but few realize that the air inside an airplane cabin is often more dehydrating than the air in the Sahara Desert. The humidity level in a desert typically hovers around 25-30%, whereas on a plane at cruising altitude, it can plummet to as low as 10-20% due to the mix of outside air and recycled, conditioned air. This creates an extremely aggressive environment for Transepidermal Water Loss (TEWL).
When your skin barrier is compromised, it is already inefficient at holding onto water. Placing it in a low-humidity environment is like opening a floodgate for moisture to escape. The dry cabin air actively pulls water from your skin, leading to rapid dehydration, tightness, and a dull appearance. This isn’t just a matter of comfort; it’s a significant stressor that can delay the healing process. Protecting your skin in such an extreme environment requires a proactive and robust defensive strategy.
The following table, based on dermatological data, starkly illustrates how different environments affect the rate of water loss from your skin. As this comparative analysis shows, the airplane cabin represents a worst-case scenario for a compromised barrier.
| Environment | Humidity Level | TEWL Rate | Barrier Impact |
|---|---|---|---|
| Airplane Cabin | 10-20% | Very High | Severe dehydration |
| Desert | 25-30% | High | Moderate dehydration |
| Indoor Heated | 30-40% | Moderate | Mild dehydration |
| Optimal Indoor | 40-60% | Low | Minimal impact |
This data highlights why an in-flight skincare routine is not an indulgence but a necessity for those in a repair phase. It means arriving at the airport with a clean face and applying a hydrating serum followed by a rich, occlusive moisturizer or balm before takeoff to create a protective shield against the harsh cabin air.
Key takeaways
- Barrier repair is a process of creating a high-moisture, protected environment for your skin to heal itself.
- The order of application is critical: apply humectants to damp skin first, then seal immediately with an occlusive moisturizer.
- A full “acid detox” is non-negotiable. Stop all exfoliants and retinoids for at least two weeks to end the cycle of irritation.
How to Apply Sunscreen Under Makeup Without Pilling?
For anyone diligently working to repair their skin barrier, sunscreen is an absolute essential. A compromised barrier is more vulnerable to UV damage, which can exacerbate inflammation and set back your healing progress. However, a common frustration arises when you try to layer makeup on top: pilling. Those annoying little balls of product are often caused by a combination of friction (from rubbing) and incompatible formulations, a problem that’s magnified on skin that is both dry and being treated with rich, occlusive products.
To avoid pilling, you need to adjust your application technique from rubbing to patting and give each layer adequate time to set. Friction is the primary enemy. When you rub sunscreen over a freshly applied, thick moisturizer, you are physically disturbing both layers and causing them to roll up into clumps. Furthermore, certain ingredients in silicon-based primers and sunscreens can react with the polymers in your moisturizer or foundation, leading to the same frustrating result. Choosing the right type of sunscreen can also help; mineral sunscreens containing zinc oxide are often a great choice for sensitive, damaged skin as zinc is also known for its anti-inflammatory and soothing properties.
Some advanced formulations are specifically designed to aid this process. For instance, according to research from L’Oréal Paris, specific cream formulations can significantly aid the repair process. Their studies show that using certain rich creams can help repair a damaged skin barrier up to 1.5x faster, making the base layer under your sunscreen more resilient. A smooth, well-prepped canvas is less likely to cause application issues.
Here is a simple protocol for a smooth, pill-free application:
- Wait 5 minutes: After applying your moisturizer, give it a full five minutes to absorb and set before you even think about touching your sunscreen.
- Use patting motions: Dispense sunscreen onto your fingertips and gently pat or press it into the skin. Do not rub.
- Choose mineral formulas: Opt for sunscreens with zinc oxide or titanium dioxide, which are generally less irritating and can help calm inflammation.
- Apply foundation with a sponge: Use a damp beauty sponge to bounce and press your foundation onto the skin, which minimizes friction and helps meld the layers together seamlessly.
Now that you are armed with the knowledge to rebuild your skin’s defenses, the next step is to consistently apply these principles. Building a gentle, supportive, and patient routine is the most powerful tool you have to restore your skin to its natural state of health and resilience.