The biggest challenge for renters is making a temporary space feel like a true home without breaking the lease or forfeiting the security deposit. The solution isn’t just buying temporary products, but mastering damage-free installation and removal techniques. This guide focuses on clever, reversible strategies for walls, lighting, and floors that create high-impact, personalized style while ensuring you get your money back when you move out.
Living in a rental often feels like an exercise in compromise. You’re surrounded by the “landlord special”—beige carpets, generic fixtures, and endless white walls that scream “temporary.” This environment can make you feel like a long-term guest in your own life, stifling your personality and preventing you from truly settling in. The core fear, of course, is the security deposit. Many renters are so afraid of nail holes, paint drips, or any sign of alteration that they resign themselves to living in a sterile, impersonal box, with the average security deposit costing at least $600.
The common advice is predictable: use removable wallpaper, add a rug, hang pictures with temporary strips. While these are valid starting points, they are merely the “what,” not the “how.” True rental transformation lies in the execution. It’s in knowing the professional trick to apply peel-and-stick wallpaper without bubbles, understanding which lighting creates architectural drama, and recognizing the one mistake that makes Command Strips rip paint from the wall.
But what if the key wasn’t just using temporary items, but mastering temporary *techniques*? This guide shifts the focus from products to process. We’ll move beyond the obvious and dive into the clever, resourceful methods that designers use to create a sense of psychological ownership in a space you don’t own. It’s about making bold, beautiful changes that are, by design, completely reversible.
We’ll explore how to conquer bland walls, manipulate light to craft mood and space, and even tackle ugly floors—all while keeping your lease agreement and your deposit safely intact. Prepare to turn your temporary apartment into a personalized sanctuary.
This guide provides a roadmap to reclaiming your rental space. Here’s a look at the clever strategies we’ll cover to help you personalize with confidence.
Summary: A Renter’s Guide to Damage-Free Customization
- Why White Walls Make You Feel Like a Guest in Your Own Home?
- How to Install Peel-and-Stick Wallpaper Like a Pro?
- Floor Lamps vs Plug-in Sconces: Which Adds More Drama?
- The Command Strip Mistake That Rips Paint Off the Wall
- Optimizing Acoustics: Using Rugs to Cover Ugly Rental Floors
- Why Visual Clutter Increases Stress Levels in Small Homes?
- How to Place Mirrors to Bounce Light Into Dark Corners?
- How to Brighten a North-Facing Room Without Major Renovation?
Why White Walls Make You Feel Like a Guest in Your Own Home?
The ubiquitous “renter’s white” isn’t just a boring color choice; it’s a psychological barrier. When every surface is a sterile blank slate, it constantly reminds you of the temporary nature of your home. It lacks history, personality, and any trace of the people living within it. This absence of personal touches prevents the development of what psychologists call “psychological ownership”—the feeling that a space is truly yours, an extension of your identity. Without it, you can’t fully relax or feel a deep sense of belonging. You remain a guest, perpetually living in someone else’s property.
Blank walls fail to provide the visual cues that anchor our memories and emotions. Color, pattern, and art are the layers that tell our story. A vibrant accent wall might reflect your energy, while a gallery of personal photos grounds you in your relationships and experiences. When you strip these elements away, the space becomes functionally adequate but emotionally vacant. It serves as shelter, but it doesn’t serve as a sanctuary.
Furthermore, an all-white, unadorned space can feel larger but also colder and less defined. There are no visual “stops” for the eye, no designated zones for activity, and no focal points to draw you in. It’s a space you occupy, not one you engage with. Breaking free from the tyranny of the white wall is the first step toward transforming a rental from a temporary address into a genuine home. The goal is to add layers that reflect you, creating a dialogue between you and your environment, even if those layers are designed to be temporary.
How to Install Peel-and-Stick Wallpaper Like a Pro?
Peel-and-stick wallpaper is the renter’s ultimate weapon against bland walls, but a shoddy application can look worse than the original paint. The difference between a professional finish and a bubbly, crooked mess comes down to preparation and technique. A flawless installation creates an accent wall that looks convincingly permanent, transforming the entire feel of a room. It’s not just about covering a wall; it’s about applying a new, temporary “skin” with precision.
Before you even peel the backing, proper wall preparation is non-negotiable. Clean the surface with a lint-free cloth and an isopropyl alcohol solution to remove any grease or dust that could interfere with adhesion. For the best results, start your installation on a smaller, less conspicuous “practice” area, like an accent wall in a powder room or the wall behind your headboard. This allows you to master the technique before tackling a larger, more prominent surface. Don’t be afraid to pull the sheet off and realign it multiple times—high-quality removable wallpaper is designed to be forgiving.
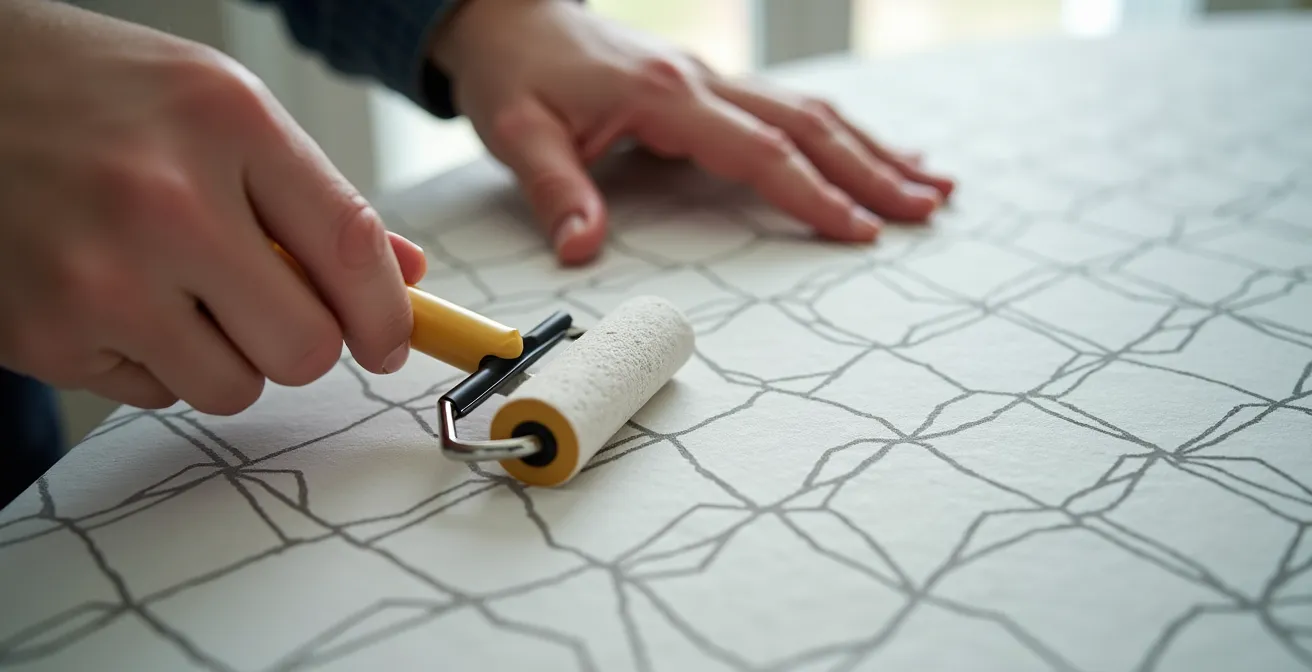
As one renter noted after a project, the right tools make all the difference. “The peel-and-stick subway tiles were super easy, while contact paper around the sink was tricky. For a pro finish, you can caulk the edges with peel-and-stick caulk.” A small J-roller or squeegee is essential for smoothing out air bubbles as you go, working from the center outwards. This single tool elevates the finish from amateur to expert. For a truly seamless look, you can even use removable caulk strips to finish the edges where the wallpaper meets the trim.
Action Plan: Flawless Removable Wallpaper Application
- Order Extra: Always purchase at least one extra sheet or roll. This provides a crucial buffer for mistakes, pattern matching, and initial misalignments.
- Start Small: Choose a single accent wall as your first project. It’s a lower-commitment way to practice your technique before attempting larger, more complex areas.
- Prep the Surface: Thoroughly clean the wall with isopropyl alcohol to remove any oils or dust that could prevent the wallpaper from adhering properly.
- Consider Decals First: If you’re a complete beginner, decorative decals can be an easier, more forgiving alternative to full sheets of wallpaper.
- Use the Right Tools: Invest in a smoothing tool or J-roller. This is the key to working out air bubbles and ensuring a flat, professional-looking finish.
Floor Lamps vs Plug-in Sconces: Which Adds More Drama?
Lighting is the fastest way to change a room’s mood, but most rentals are cursed with harsh, central overhead fixtures. While floor lamps are an easy fix, plug-in wall sconces offer a more sophisticated, architectural solution that creates instant drama without requiring an electrician. They elevate light from a mere utility to a key design element, casting dramatic shadows and creating focal points just like professionally hardwired fixtures.
A floor lamp provides ambient or task lighting and is fully portable, but it also takes up valuable floor space and can contribute to visual clutter in a small room. Plug-in sconces, by contrast, have a zero-floor footprint. Mounted on the wall, they flank a sofa, bed, or mirror, adding a layer of symmetry and intentionality that feels custom and permanent. They are perfect for creating “up-lighting” or “down-lighting” effects that wash the wall in a soft glow, adding depth and texture to a flat surface. While some advanced options exist for converting hardwired fixtures, designer Emily Henderson wisely cautions, “This is a more advanced move and we advise acquiring the help of an electrician unless you are confident in your wiring abilities.” For most renters, the plug-in version is the ideal, damage-free choice.
This is a more advanced move and we advise acquiring the help of an electrician unless you are confident in your wiring abilities.
– Emily Henderson, Emily Henderson Blog – Renter Design Hacks
The choice between the two depends on your goal. If you need flexible task lighting that can move with your furniture, a floor lamp is a practical choice. But if you want to create a dramatic, high-end look and add architectural interest to your blank walls, plug-in sconces are the superior tool for the job.
| Feature | Floor Lamps | Plug-in Sconces |
|---|---|---|
| Floor Space Impact | Takes up floor space | Zero floor footprint |
| Light Type | Ambient/Task lighting | Accent/Dramatic up/down lighting |
| Visual Impact | Can add to clutter | Creates architectural interest |
| Installation | No installation needed | Simple wall mounting |
| Portability | Fully portable | Semi-permanent |
The Command Strip Mistake That Rips Paint Off the Wall
Command Strips are a renter’s best friend for hanging art without nails, but they have a dark side: used incorrectly, they can rip off a chunk of paint and drywall, jeopardizing your security deposit. The single most common mistake is pulling the removal tab out and away from the wall. This action puts immense pressure on the paint’s surface, causing it to tear. The genius of the Command adhesive is in its release mechanism, which is only activated when the tab is pulled straight down, parallel to the wall.
The proper technique involves stretching the tab slowly and deliberately downwards, keeping it flat against the wall surface. As you stretch the tab, you’ll feel the adhesive release its grip. You may need to stretch it as far as 15 inches before it fully lets go. Rushing this process or pulling at an angle is what leads to damage. It’s also critical to respect the weight limits. Using an undersized strip for a heavy frame is a recipe for a crash in the middle of the night and a guaranteed wall repair bill.
Before you commit to hanging your gallery wall, perform two crucial checks. First, clean the wall with isopropyl alcohol to ensure a clean bond. Second, if you suspect your landlord used cheap, flat latex paint (which is common in rentals), test one strip in an inconspicuous spot, like inside a closet or behind a large piece of furniture. Let it cure for the recommended time, then practice the removal technique. This small test can save you from a costly, large-scale repair job down the line. Proper execution is the only thing standing between a beautiful, personalized wall and a deposit deduction.
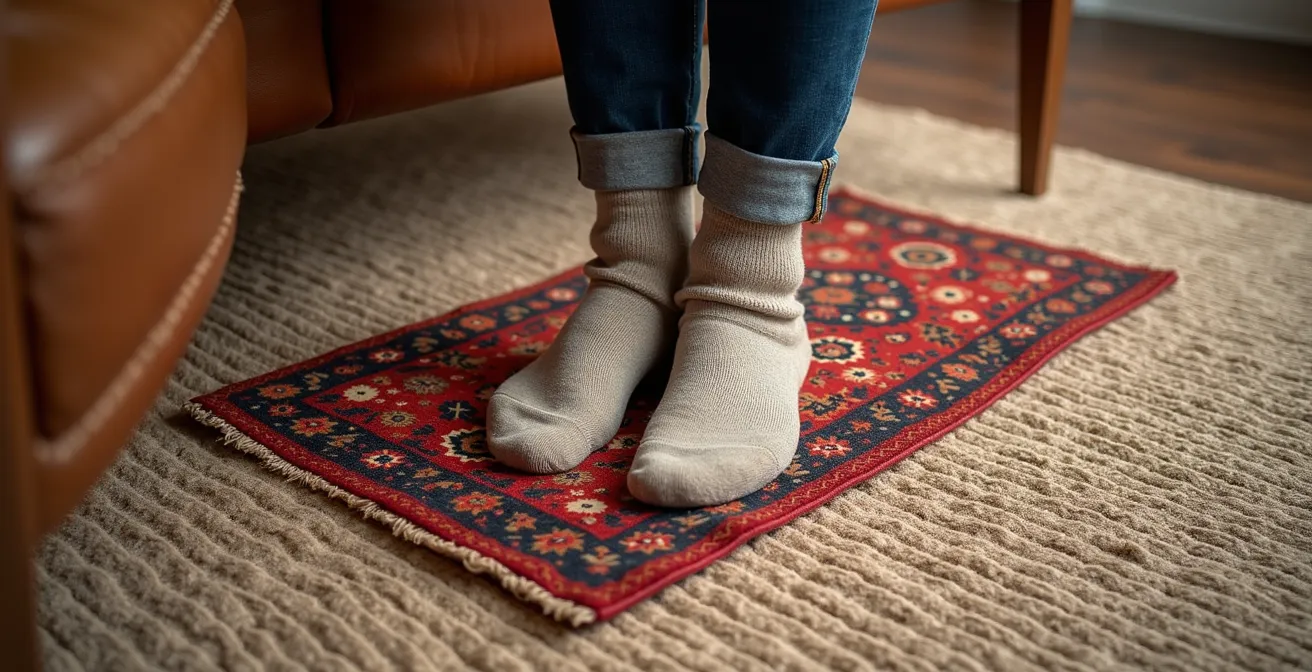
Optimizing Acoustics: Using Rugs to Cover Ugly Rental Floors
Ugly rental flooring—be it dated linoleum, stained carpet, or scuffed laminate—can drag down the entire aesthetic of a room. While you can’t tear it out, you can strategically cover it. A large area rug is the most straightforward solution, but thinking beyond a single rug can elevate your design. Using rugs is not just about hiding an ugly floor; it’s about defining zones, adding texture, and improving acoustics in your space.
Layering rugs is a clever designer trick to add depth and personality. Start with a large, inexpensive neutral base rug (like jute or sisal) that covers most of the offensive flooring. Then, layer a smaller, more vibrant, or plusher rug on top to define a specific area, like the seating arrangement in your living room. This creates a custom, sophisticated look while adding immense warmth and texture. The layers also work wonders for sound absorption, reducing echo in sparsely furnished rooms and making the space feel cozier and more intimate.
For those willing to go a step further, temporary flooring solutions offer a more complete transformation. As one renter shared, “Brady’s insanely affordable vinyl floor hack cost under $50. The best part is you don’t have to touch the original tile at all. It basically entails measuring the space and putting down tile ‘stickers’.” These peel-and-stick vinyl tiles or planks can be laid directly over existing hard flooring and removed at the end of your lease. For a more durable but intensive option, interlocking floating floor panels can be installed on top of the original floor, but always check with your landlord before undertaking such a project.
Why Visual Clutter Increases Stress Levels in Small Homes?
Before you add a single new decorative item to your rental, the most impactful change you can make is to subtract. Visual clutter—the disorganized pile of mail, the overflowing bookshelf, the tangle of cables—is more than just an aesthetic issue. It’s a significant source of stress. Our brains are wired to constantly process our surroundings. When a space is cluttered, it bombards our minds with excessive stimuli, making it difficult to focus, relax, and feel at peace. This is especially true in smaller rental apartments where space is already at a premium.
As licensed psychologist Dr. Aniko Dunn explains, the connection is direct: “Crowded spaces make our minds crowded. Studies show that stress affects your mood and may cause you to feel anxious and depressed.” In fact, a study performed on 1,000 people across the U.S. shows that a clean and minimalist living space can help increase positive emotions and alleviate symptoms of depression. A cluttered environment signals to our brain that our work is never done, creating a persistent, low-grade sense of anxiety and overwhelmingness.
Crowded spaces make our minds crowded. Studies show that stress affects your mood and may cause you to feel anxious and depressed.
– Dr. Aniko Dunn, Licensed Doctor of Psychology
In a rental context, personalization can easily tip into clutter. The desire to inject personality can lead to adding too many small, disconnected items. The key is strategic curation. Instead of ten small knick-knacks, choose one large, impactful piece of art. Instead of an open shelf of mismatched paperbacks, use elegant storage boxes to conceal the chaos. By decluttering first, you create a calm, clean canvas. This makes the decorative elements you *do* add feel more intentional, special, and impactful, allowing you to personalize your space without triggering the stress of a chaotic environment.
How to Place Mirrors to Bounce Light Into Dark Corners?
Mirrors are the oldest trick in the book for making a small, dark room feel larger and brighter, but their effectiveness depends entirely on strategic placement. Simply hanging a mirror on a random wall is a missed opportunity. To truly harness its power, you must think like a lighting designer, using the mirror’s reflective surface to actively capture and redirect light into the darkest corners of your rental apartment.
The most effective technique is to position a large mirror directly opposite your primary light source, typically a window. This essentially doubles the amount of natural light pouring into the room, creating an effect of a “phantom window” and instantly brightening the entire space. Don’t limit yourself to traditional wall-hung mirrors. A large, full-length leaner mirror propped against a wall in a dark hallway or corner can dramatically alter the perception of space and light without a single nail hole. The science backs this up; a study found that inadequate daylighting can increase the probability of depression by 60%, making mirror placement a crucial wellness strategy.
To find the optimal spot, stand in the darkest part of the room and look at the opposite walls. The wall that reflects the most light or the most interesting view is where your mirror should go. For a more advanced approach, consider using multiple mirrors. A collection of small, decorative mirrors can scatter light in interesting ways, while a convex mirror can offer a panoramic view of the room, adding a sense of movement and expansive depth. By treating mirrors as active light-bouncing tools rather than passive decorations, you can solve the problem of a dark rental with nothing more than a few clever placements.
Key Takeaways
- Damage-free personalization is about mastering reversible techniques, not just buying temporary products.
- Strategic use of lighting, mirrors, and textiles can create architectural and emotional depth in a bland space.
- Proper preparation and removal methods for products like peel-and-stick wallpaper and Command Strips are essential to protect your security deposit.
How to Brighten a North-Facing Room Without Major Renovation?
A north-facing room, with its cool, indirect light, presents one of the biggest challenges for a renter. The light is consistent but can feel flat and gloomy, and you can’t exactly add a new window. Brightening such a space without renovation requires a multi-layered approach that combines all the clever hacks we’ve discussed: manipulating light, choosing the right colors, and embracing modern technology.
First, maximize the light you have. This is where strategic mirror placement becomes non-negotiable. A large mirror opposite the main window will be your most powerful tool. Combine this with a light, warm color palette—not stark white, which can look gray in cool light, but rather warm off-whites, soft yellows, or blush pinks applied via peel-and-stick wallpaper. Keep window treatments minimal and sheer to let in every possible ray of light.
Next, you must become the master of artificial light. A single overhead fixture won’t do. Layer your lighting with a combination of floor lamps for ambient glow and plug-in sconces to wash walls with warm light. The key is to use bulbs with a warm color temperature (around 2700K) to counteract the cool natural light. This is where smart home technology becomes a renter’s secret weapon. Smart bulbs allow you to control not just the brightness but also the color temperature throughout the day, adapting the room’s mood from a bright, productive space in the afternoon to a cozy, warm den in the evening. This level of control is something younger renters now expect; as one report notes, Gen Z renters consider smart home technology a non-negotiable amenity.
By combining these damage-free strategies, you can transform even the most challenging rental into a bright, inviting, and deeply personal home. Your space is a canvas—start painting it with light, texture, and your own unique style.