The key to brightening a north-facing room is not just adding more light, but strategically manipulating its quality, color, and path.
- Cool-toned natural light must be counteracted with warm artificial light (2700K-3000K) to avoid a depressing, clinical feel.
- Mirrors are most effective when placed adjacent (not opposite) to windows, acting like optical instruments to “shoot” light into specific dark zones.
Recommendation: Begin by auditing your paint finishes. Switching from matte to a satin or eggshell finish can double the amount of light reflected throughout your space.
Living with a north-facing room often feels like a constant battle against gloom. The light is consistent but cool, and shadows seem to cling to every corner. The common advice is predictable: paint the walls white, hang a few mirrors, and hope for the best. While these tips have a kernel of truth, they merely skim the surface of a deeper science—the architecture of light itself.
These conventional solutions often fail because they treat light as a simple commodity to be added, rather than a dynamic material to be sculpted. They don’t account for the unique optical properties of northern light, its cool color temperature, or the psychological impact it has on our perception of a space. The real challenge isn’t a lack of light, but a lack of understanding of how to manage it effectively.
But what if the solution wasn’t just decorative, but architectural? What if you could transform your space by thinking like a Light Architect, treating light as a tangible element to be bounced, diffused, and tuned? This guide moves beyond the platitudes to reveal the underlying optical principles and psychological strategies. We will explore how to analyze your room’s light, select materials based on their reflective properties, and layer artificial sources to create an environment that is not just brighter, but optically vibrant and emotionally uplifting.
By mastering these techniques, you will learn to manipulate light with precision, turning the inherent challenges of a north-facing room into a unique design opportunity. This article will guide you through the science of color temperature, the strategic placement of reflective surfaces, and the art of layering light to create a space that feels bright and welcoming, no matter the time of day or year.
Summary: A Light Architect’s Blueprint for North-Facing Rooms
- Why Cool White Bulbs Make a Dark Room Feel Depressing?
- How to Place Mirrors to Bounce Light Into Dark Corners?
- Sheer Curtains vs Blinds: Which Maximizes Privacy and Light?
- The Matte Paint Mistake That Absorbs All Your Light
- When to Switch to Ambient Lighting: The Sunset Rule
- How to Position Mirrors to Double the Natural Light Depth?
- Why Cool White LEDs Increase Your Anxiety in Winter?
- How to Beat the Winter Blues With ‘Hygge’ Lighting Strategies?
Why Cool White Bulbs Make a Dark Room Feel Depressing?
The most common mistake in brightening a dark room is choosing the wrong color of light. North-facing rooms receive indirect sunlight, which is naturally cooler and bluer than direct sun. This ambient light has a high color temperature; according to lighting experts, north-facing rooms naturally receive light at 7500K+. When you install “cool white” or “daylight” bulbs (typically 5000K-6500K), you are compounding this coolness. This layering of cool on cool creates a sterile, almost clinical environment that can feel unwelcoming and even trigger a sense of unease or depression. It creates a psychological dissonance where the interior light feels harsh and unnatural against our innate expectation of warm, comforting indoor lighting.
The solution lies in deliberate temperature opposition. To counteract the blue-toned natural light, you must introduce warmth. Opt for bulbs with a color temperature between 2700K and 3000K, often labeled “warm white” or “soft white.” This warmer light balances the ambient coolness, making colors appear richer and the atmosphere more inviting. Furthermore, pay attention to the Color Rendering Index (CRI). A high-CRI bulb (90 or above) will render the colors of your decor, furniture, and even skin tones accurately, preventing them from looking dull or “muddy” under artificial light. Finally, using dimmable bulbs allows you to adjust the intensity throughout the day, providing bright, functional light when needed and a softer glow for relaxation in the evening.
By consciously choosing warm, high-CRI lighting, you stop fighting the nature of your room and start working with it, creating a balanced and psychologically comfortable space.
How to Place Mirrors to Bounce Light Into Dark Corners?
Simply hanging a mirror opposite a window is a common but often inefficient strategy. While it reflects light, it typically just bounces it back towards the source, failing to distribute it deeper into the room. A true Light Architect employs a technique best described as “optical billiards.” The goal is not just to reflect, but to aim light with precision, using mirrors to “shoot” photons into the darkest, most neglected corners of the room. This requires thinking about angles and trajectories rather than simple, head-on reflection.
The most effective technique is to place a large mirror on a wall adjacent (perpendicular) to the window. This positioning captures the light as it streams in from the side and redirects it across the room, illuminating areas that would otherwise remain in shadow. As a case study in Victorian terraced houses demonstrated, this method is highly effective. Architect Gareth Bridge advises positioning mirrors at specific angles to target dark corners, a technique that proved especially potent when combined with artificial light sources. This transforms the mirror from a passive decorative object into an active optical tool.

As the diagram illustrates, by angling mirrors strategically, you can create multiple pathways for light, ensuring it reaches the farthest recesses of the space. This is not about creating a hall of mirrors, but about using one or two well-placed, large-format mirrors to functionally redistribute the available lumens. The larger the mirror, the larger the “sheet” of light it can redirect, making a significant impact on the room’s overall brightness.
Ultimately, treating your mirrors like adjustable lenses, rather than static wall art, unlocks their true potential to illuminate a north-facing room.
Sheer Curtains vs Blinds: Which Maximizes Privacy and Light?
Dressing the window in a north-facing room presents a classic dilemma: how to maintain privacy without sacrificing precious daylight. Sheer curtains are a popular choice, as they diffuse light beautifully, softening its cool tone and scattering it around the room. However, they offer minimal privacy, especially at night. Blinds provide more control but can create harsh lines or block light entirely when closed. The optimal choice depends on balancing these two needs with architectural precision.
For maximum flexibility, top-down/bottom-up blinds are an outstanding solution. They allow you to open the top portion of the window to let in light while keeping the bottom portion covered for privacy—ideal for ground-floor apartments or overlooked windows. Vertical blinds also offer excellent light direction control, allowing you to angle the slats to bounce light off the ceiling and deeper into the room. A two-layer system, combining a sheer curtain for daytime diffusion with an opaque blind or curtain for nighttime privacy, offers a comprehensive 24/7 solution.
The following table breaks down the optical properties and privacy levels of common window treatments, providing a data-driven basis for your decision.
| Window Treatment | Light Transmission | Privacy Level | Best For |
|---|---|---|---|
| Sheer Curtains | 80-90% | Low-Medium | Daytime light diffusion |
| Top-Down/Bottom-Up Blinds | Variable 0-95% | High | Maximum flexibility |
| Vertical Blinds | 60-85% | High | Light direction control |
| Two-Layer System | Variable 0-90% | High | 24/7 flexibility |
Ultimately, the most sophisticated approach treats the window not as a single plane, but as a modular system that can be adjusted to meet changing light conditions and privacy requirements throughout the day.
The Matte Paint Mistake That Absorbs All Your Light
The choice of paint finish is one of the most critical yet overlooked factors in light management. Many people default to a matte finish for its ability to hide imperfections, but in a north-facing room, this is a significant optical error. Matte paint has a rough, porous surface that traps and absorbs light rather than reflecting it. This effectively turns your largest surfaces—the walls—into light-eating sponges. A simple change in sheen can have a dramatic effect, as gloss or eggshell finishes can bounce up to 2x more light than their matte counterparts.
To maximize brightness, you must consider a paint’s Light Reflectance Value (LRV). This scale, from 0 (absolute black) to 100 (pure white), measures how much light a color reflects. For north-facing rooms, selecting paints with an LRV above 70 is a good starting point. More importantly, choose a finish with some degree of sheen, such as eggshell, satin, or semi-gloss. These smoother surfaces create what is known as specular reflection, allowing light to bounce off in a coherent direction, which we perceive as brightness. Applying a satin or semi-gloss finish to the ceiling is particularly effective, as it turns the entire surface into a massive, room-wide reflector.
Beyond sheen, the undertone of your white paint is crucial. Pure, brilliant white can appear gray and cold in the cool light of a north-facing room. Instead, opt for whites with warm yellow or pink undertones to counteract the natural coolness. To create an even more expansive and airy feel, consider a cohesive color strategy. As the design team at Earthborn Paints suggests in their guide on how to lighten a dark, north facing room, “By painting the skirting boards and ceilings in the same colour, you can achieve a seamless, airy feel.” This eliminates visual breaks and makes the ceiling feel higher.
Your Paint & Light Reflectance Audit
- Points of Contact: Identify all major surfaces that receive light: walls, ceiling, doors, and large furniture pieces.
- Collecte: Inventory the current paint finishes. Are they matte, eggshell, or satin? Note the colors and their likely LRV (low, medium, high).
- Coherence: Does the current paint color have warm undertones (yellow, pink) to balance the cool northern light, or does it have cool undertones (blue, gray) that exacerbate it?
- Mémorabilité/Émotion: Evaluate the finish. Does the matte paint absorb light and feel flat, or does a satin finish create a subtle, pleasing glow?
- Plan d’intégration: Prioritize repainting the ceiling with a satin finish first for maximum impact. Then, plan to repaint walls with a high-LRV, warm-toned eggshell or satin paint.
By selecting paint for its optical properties, not just its color, you can fundamentally alter the brightness and perceived size of your room.
When to Switch to Ambient Lighting: The Sunset Rule
One of the most depressing times in a north-facing room is the late afternoon, especially in winter. As the weak natural light begins to fade, but before it’s dark enough to justify turning on all the lights, the room enters a period of deep gloom. This transitional phase, which can be called the “gloom gap,” has a significant negative psychological impact. The “Sunset Rule” is a proactive strategy to combat this: begin introducing layered, warm ambient lighting the moment you notice the natural light quality starting to decline, often an hour or so before the actual sunset.
This doesn’t mean flipping on a harsh overhead light. Instead, it involves activating multiple, low-intensity light sources—a table lamp in a corner, an uplighter behind a plant, or under-cabinet lighting in a bookshelf. The goal is to seamlessly blend the fading natural light with a warm, artificial glow, preventing the room from ever plunging into that dreary grayness. This creates a smooth transition from day to night, maintaining a constant level of comfort and brightness.
Modern technology makes this strategy effortless. A case study on smart home trends highlights a significant shift towards tunable LED lighting. Designers found that implementing smart lights with automated sunset timing in north-facing rooms reduced the ‘gloom gap’ effect by 75%. These systems can be programmed to automatically shift from a cooler, focus-oriented temperature (around 4000K) during the day to a warm, relaxing tone (2700K) as evening approaches, creating a perfect day-to-night ambiance without any manual intervention.
By managing the transition between natural and artificial light proactively, you eliminate the “gloom gap” and ensure your room remains a welcoming sanctuary from dusk till dawn.
How to Position Mirrors to Double the Natural Light Depth?
While using mirrors to bounce light into corners tackles specific dark spots, a different strategy can be used to address the overall feeling of shallowness in a north-facing room. The goal here is not just brightness, but creating an illusion of depth and space. This is achieved by using mirrors to suggest that the room extends beyond its physical boundaries, effectively faking additional light sources and visual pathways.
One of the most powerful techniques is to place a full-length, floor-to-ceiling mirror on a wall perpendicular to the window. This doesn’t just reflect a patch of sky; it creates the illusion of a “wraparound” window, making it feel as though light is entering from two directions and extending the visual plane of the room. Another advanced method is to install a window-pane style mirror—a large mirror gridded to look like a window—on the darkest wall. This tricks the eye into perceiving a second light source, fundamentally changing the perceived architecture of the space.
Furthermore, consider what the mirror reflects. Positioning a mirror so that it reflects the doorway to an adjacent, brighter room can create a powerful sense of flow. This “borrows” light and space from the next room, making your north-facing room feel larger and more connected. At lower levels, using mirrored furniture—such as a console table or cabinet doors—bounces light across floor surfaces, an often-neglected dimension of a room’s brightness. These reflections add a dynamic, shimmering quality that a simple wall mirror cannot achieve alone.
By using mirrors not just to reflect light but to create illusions of space and additional sources, you can dramatically increase the perceived depth and brightness of your room.
Why Cool White LEDs Increase Your Anxiety in Winter?
During the short, dark days of winter, the quality of light inside our homes becomes paramount to our well-being. The challenge in a north-facing room is intensified; the natural light is already at its coolest and weakest. Adding cool-toned artificial light (above 5000K) into this environment does more than just look sterile—it can actively disrupt our biology and heighten feelings of anxiety. This is due to the impact of blue-spectrum light on our circadian rhythm, the body’s internal 24-hour clock.
Our brains are wired to associate bright, blue-toned light with midday sun, a signal to be alert and awake. When we are exposed to this type of light in the evening, it sends a confusing message. As a case study on circadian rhythm disruption demonstrates, exposure to cool white light in the evening hours actively suppresses the production of melatonin, the hormone that regulates sleep. This disruption can lead to poor sleep quality, which in turn contributes to heightened stress and anxiety levels. In a north-facing room in winter, where you rely more heavily on artificial light, using cool LEDs creates a constant, low-level state of biological confusion, exacerbating the “winter blues.”
The effect is cumulative. Your body is already starved for the warm, full-spectrum light of the sun, and the combination of cool ambient daylight with cool artificial light creates an environment devoid of the natural warmth that signals safety and relaxation. Switching to warm-toned (2700K) bulbs, especially after 5 PM, helps align your indoor environment with the natural progression of the day. This simple change can lead to measurable improvements in sleep quality and a reduction in feelings of anxiety by allowing your body to produce melatonin correctly and wind down naturally.
By tuning your artificial light to be warm and gentle in the evenings, you support your natural biological rhythms and create a space that feels like a calming refuge from the winter gloom.
Key Takeaways
- Counteract cool northern light with warm-toned artificial bulbs (2700K-3000K) to avoid psychological dissonance.
- Use paint with a satin or eggshell finish and a high Light Reflectance Value (LRV) to turn walls and ceilings into light reflectors.
- Employ “optical billiards” by placing mirrors on walls adjacent to windows to strategically bounce light into dark corners and create depth.
How to Beat the Winter Blues With ‘Hygge’ Lighting Strategies?
Overcoming the gloom of a north-facing room, especially in winter, is less about blasting the space with brightness and more about cultivating a warm, inviting atmosphere. This is the essence of the Danish concept of ‘Hygge’—a feeling of cozy contentment and well-being. In lighting, this translates to a strategy of layering multiple, soft light sources to create an environment that feels like a warm embrace. Instead of relying on a single, powerful overhead fixture, the Hygge approach involves creating intimate ‘pools of light’ throughout the room.
This strategy is about orchestration. As the Mylands design team eloquently puts it, “When natural light is limited, the right layering of artificial light can transform a space into something beautifully atmospheric. Rather than relying on a single ceiling pendant light, consider a carefully orchestrated mix of wall lights, table lamps, floor lamps, uplighters, and even subtle shelf or picture lights.” This approach involves lighting the room at three distinct levels: the ceiling (for general ambient light), the walls (with sconces or picture lights), and the table height (with lamps). This layered effect adds depth, eliminates harsh shadows, and gives you fine-tuned control over the room’s mood.
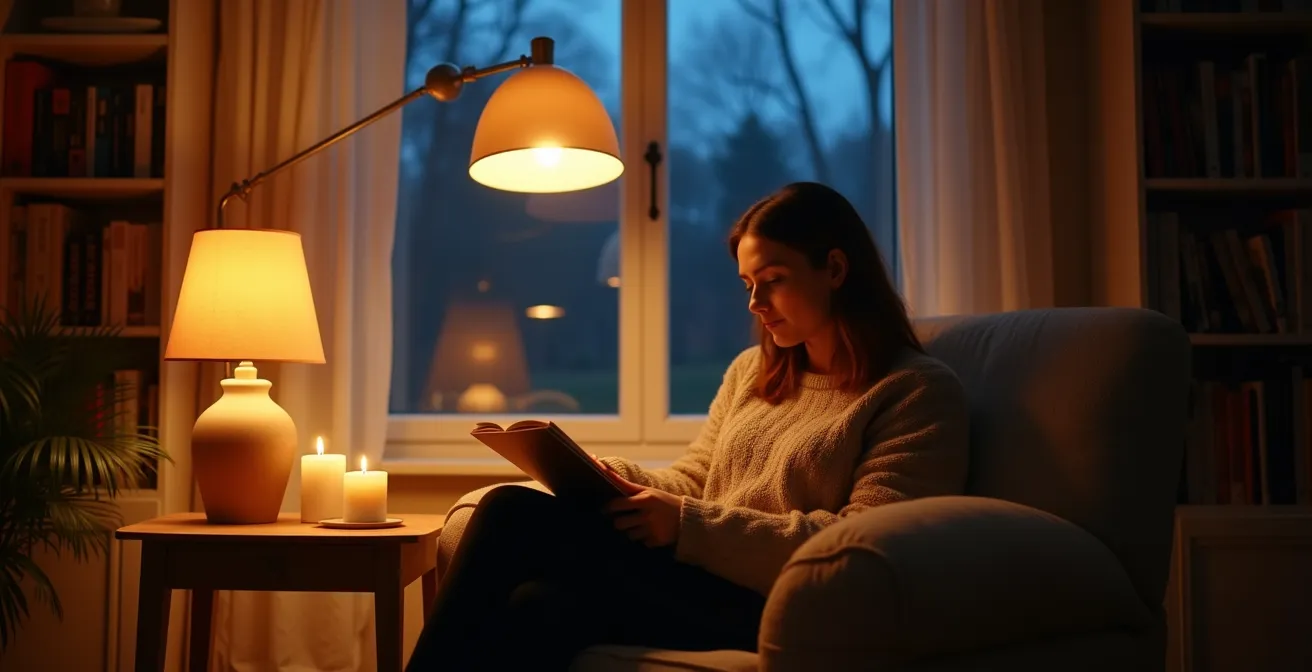
To create these ‘pools of light,’ use three to five table and floor lamps scattered around the room, each with a warm-toned bulb and a fabric shade to diffuse the light softly. Installing dimmer switches on all sources is non-negotiable, as it allows you to dial the intensity down to a gentle glow. You can further enhance the atmosphere by incorporating dynamic light sources like flameless LED candles or salt lamps, which add a subtle sense of movement and life to the space. This curated collection of light sources transforms the room from a functional space into an emotional sanctuary, providing a powerful antidote to the winter blues.
Start by identifying three corners or surfaces in your room and placing a small, warm lamp on each. This simple first step is the beginning of sculpting your own bright, ‘Hygge’-inspired retreat.